Archive for the ‘Techniques And Technology’ Category

Finishing Things Up: SCHOOLYARD

Wednesday, April 10th, 2013

So, in the next 4 weeks, I need to do the following:

– Finish up all of my animation

– Light all of my scenes

-Render all of my scenes

and then of course composite those renders into my animatic, which will then no longer be my animatic but rather my final, polished Thesis Film.

And it’s interesting because while that list is numerically small, each of those 3 things are very very long tasks.

But luckily I took a huge chunk out of the first one today! (and a bit of yesterday too)

And by that, I mean — I’ve been animating new material like a motherfucker!

“But Max, I thought you’d already roughed in all your animation!”

Ah yes, imaginary voice in my head, that IS kind of true. But not really. Because by that, I originally meant that I had roughed in all of my IMPORTANT animation. But what I’d neglected to animate until today was the characters that are going to fill out the Schoolyard location of my thesis film. And I’d been putting that off for two reasons:

1) It’s not important and it doesn’t support the story

2) I knew it was going to be really difficult.

But it had to be done, and last night + today, I did it all! Well, I roughed it all out. Tomorrow I’m going to finalize it all. But that will be much MUCH easier than finalizing the animation of the more important shots of my film, because these Playground shots are all going to be in the background of my shots — they’re all gonna be far away, unimportant, and nondescript. So really, the animation can be relatively shitty, and no one will notice! As long as there’s movement.

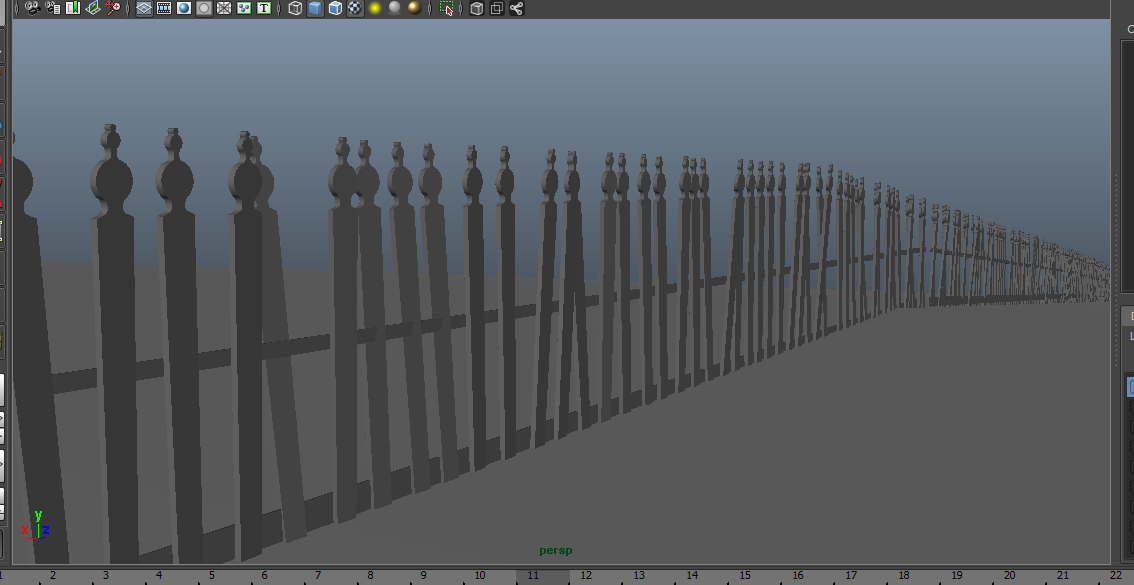
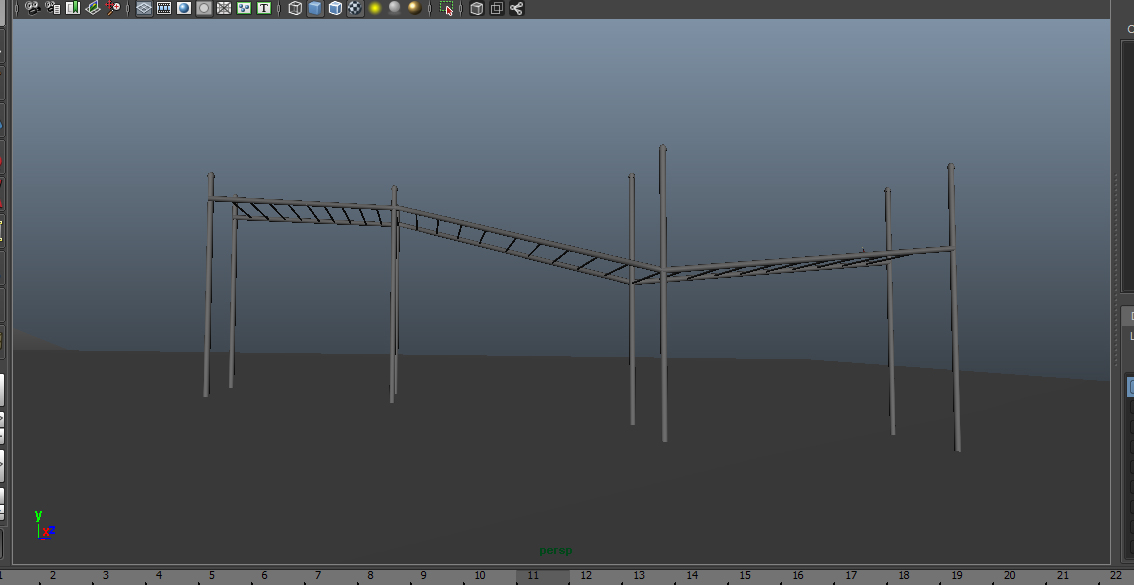
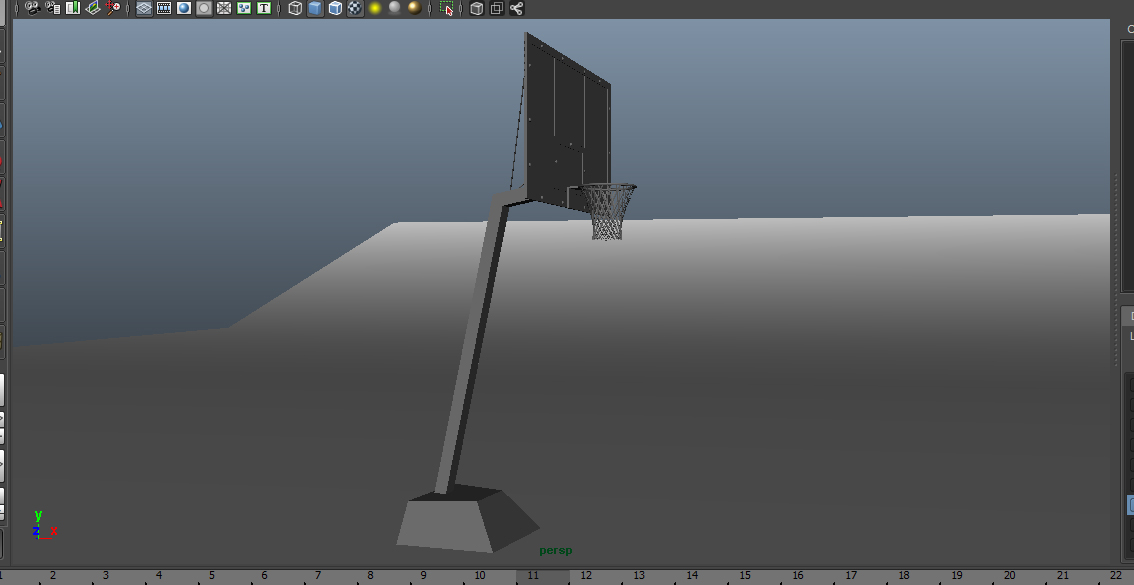
But unfortunately, creating a schoolyard full of kids posed several challenges at once. Not only did I have to create 25 (yes, 25 — and I may do more) new mini-animations, but I also had to make sure that those kids were all not overlapping each other in space, AND that the entire composition as a whole looked good.

But having a scene with 25 character rigs PLUS location rigs all referenced into each other = a surefire way to crash my computer. But luckily, I understand the power of COMPOSITING, so that I can render each mini-animation separately, and then mix them all together later.

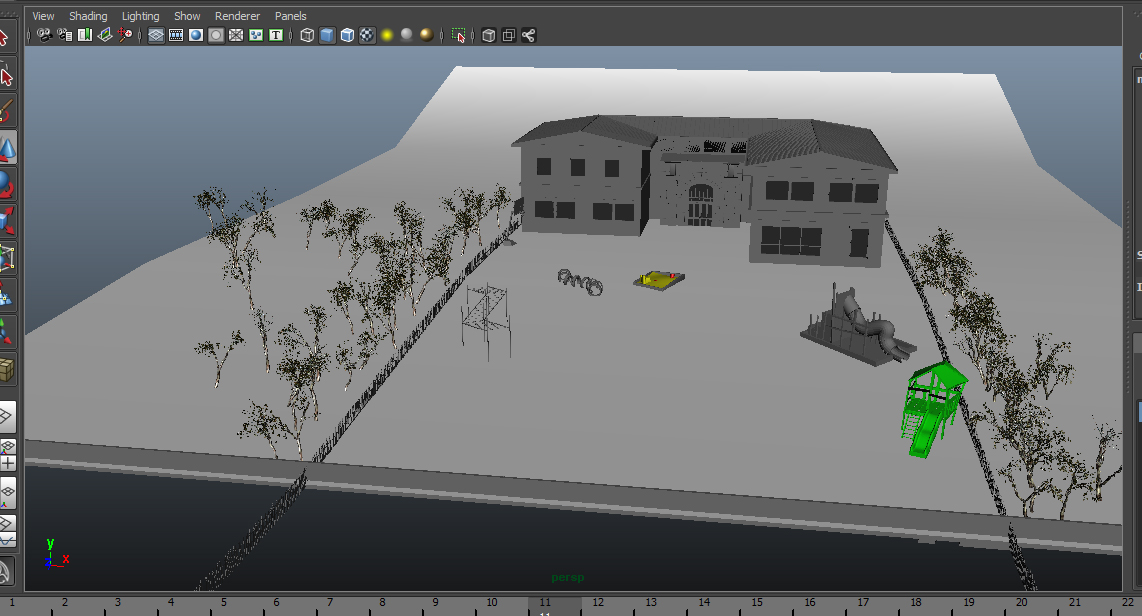
But getting the initial comp right was in of itself a challenge. Here’s what I originally was working with:

SchoolyardCompShot

This was me animating the characters and putting them together into the Schoolyard Composition that I already had made long, long ago. And as you can see, this schoolyard looks mighty barren. Also? The school BUILDING itself was way too big! And at first I thought “should I just put in more kids?”

Luckily, however, I realized the perfect solution — move all the Schoolyard objects CLOSER TOGETHER!

But unfortunately I had already animated all these kids…. And moving the schoolyard elements (the playground, the monkey bars, the slide, etc.) would shift them AWAY from the animations… uh oh…

But luckily, I have MATH on my side! So, what I did to avoid fucking everything up, essentially, was I took note of the ORIGINAL X, Y, and Z location coordinates of ALL of the schoolyard elements (I didn’t move the ground or wall however), and I then moved those elements to their new, closer positions. I THEN took note of the NEW positions of all the elements.

THEN, I went into Excel, and computed the DIFFERENCE of the values of the new and old X, Y, and Z coordinates, so that I then had the exact amounts I needed to move each character in the schoolyard whose animation depended on the physical structure of a schoolyard element.

And let me tell you…

SchoolyardComposite_NEWLOCATION

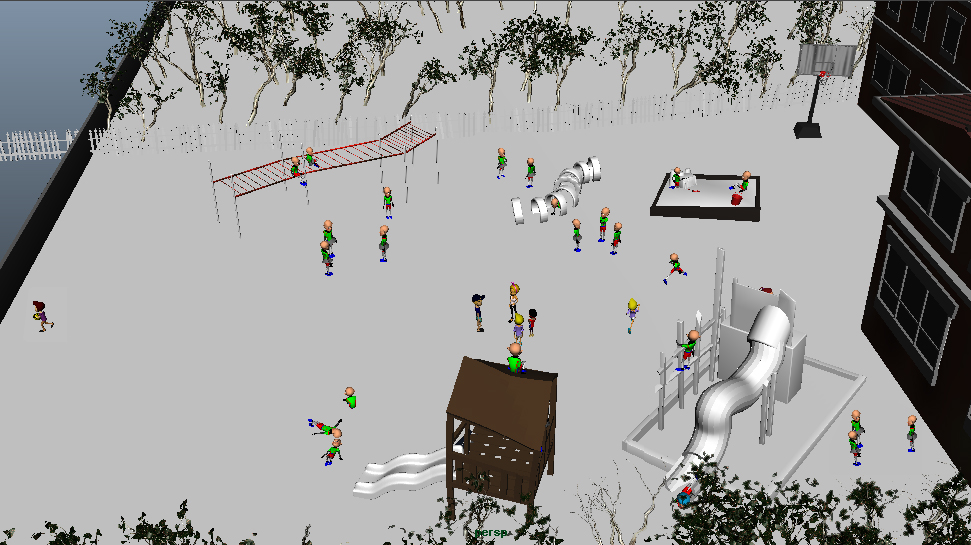
It worked out OK.  Now, that re-locating and re-calculating process alone took ~3.5 hours. But it would have taken over a day if I didn’t do those calculations. So I’ll be praising the lord tonight that I know Math! Thank you, Gunn High School! Looks like some math/science skills come in handy for art majors after all. 😉

Anyway, as you can see in the new composite, it’s much better looking, but I’m going to sleep on it now and look at it tomorrow and decide if it’s still too barren-looking or not. And if I wanna add some more characters, then hell, I’ll add some more characters. Ironically enough, ANIMATING this stuff was the QUICKEST part of it all!

But for now, I’m going to sleep, because once again I’m making these posts at 2AM. Later, y’all!

More to come. 🙂

Ways To Keep Yourself Going

Friday, March 15th, 2013

So this isn’t gonna be a post about animation, or techniques, and it won’t have any fancy images in it, but rather it’s just a list of things I do in order to keep my motivation up when it comes to working on my thesis film. It’s a Friday afternoon right now as I type this, and I suddenly found myself thinking out loud, “Wow, I don’t feel like working today! On anything! At all!”

But I need to press on, because I plan on putting together my 15th animatic by the end of today, and I’m also almost done animating the 3D assets for Picture Lock!! (I’m working on the last scene, woohoo!)

So I figured I would procrastinate a little more by making a post about how I keep myself from procrastinating. Ironic? Yea probably.

  1. Play music: I find that this works but it needs to be done right. And by that I mean you need to set up a whole playlist, or take an entire ALBUM of songs and put them into your music player. Just putting in one song won’t work, because then that’ll end in 3-5 minutes, and suddenly your attention span disappears without the flow of tunes, and you’ll lose motivation all over again.
  2. DJ Playlists: You can especially find good ones on Youtube. Here’s one for example: Mixes are great though because they provide over an hour of constant, bumpin’ beats to keep you focused on your art!
  3. If You’re Lipsynching…: Unfortunately though when you’re doing Lip Synch animation, you can’t really have loud music playing in the background, because you need to listen to the audio track you’re animating to. One way around this though is to play light music QUIETLY in the background. You can also toggle Windows’ sound mixer to make the internet audio low and Maya’s audio high, so you’ll always hear the track you’re working with. However this still only works to some extent, and I have yet to figure out how to make Lipsynching animation not like pulling teeth when it comes to staying motivated.
  4. Stand-up Comedy PerformancesStandup Comedy is great to play in the background, because it’s entertaining, it’s light chat, and depending on the comedian, it’s not something you necessarily feel the need to look at. Like for example, Maria Bamford or Margert Cho are good comedians to listen to in the background because most of their comedy is driven by the funny voices they puts on. However, Dane Cook, or Carrot Top aren’t as useful, because they depend more on physical/acting for their routines, which makes you want to look away from the Maya window and will therefore kill your motivation to keep working.
  5. Interviews: I’ve lately found that putting on an interview in the background is also really great, but has to be something that interests you (duh, because otherwise you won’t want to listen to it at all). One example of an interview I like are these Drag Race At Sea Q&A sessions that come in 8 parts and are ~20 min long each: 
  6. Work With Friends: For me, working alone causes me to go stir crazy, and when that happens, I suddenly stop animating for ~2 hours and I’m instead dancing around my room to “I’m So Excited” by The Pointer Sisters. But if there’s someone you’re friends with in the room with you while you work, then that alone can keep you focused. Some people can also do this with complete strangers (hence why many people go to the library to work) but I don’t find that that helps… instead that just makes me feel claustrophobic. This method, though, reminds me of back in High School when I first started animating, and I remember my dad would always walk into my room, sit on my bed, and watch me animate. He’d very rarely ever say anything while I worked, but he just watched. And while he wasn’t actively doing anything to engage me, just having him in the room there somehow kept me focused, and it also made me feel loved. And so whenever anyone else sits in the same room with me quietly while I work, that reminds me of those times with my dad back in High School.

But come to think of it, I think that the main cause of procrastination/losing steam while you’re working… is fear. Fear that you’re not doing your work right, or that you’re not doing it well-enough, or if you’re in the situation I’m in right now, fear that you won’t get a good job after college, or that your film won’t turn out well, or as well as you hope it will. But the opposite of fear, as we all know, is love, and luckily love can come in many different forms, whether it’s music, comedy, listening to people you admire speak, or even just silently being around someone else while you work.

So I guess I’ll conclude my post with that — especially since I should probably get back to work now — and I hope that you all have a great Spring Break/Weekend/whatever you’re doing in the future!

Also, if you want, I’d love it if you post in the comments ways that YOU keep yourself motivated to keep working. I’m curious to see if anyone else has any suggestions for me/other people who read this. I know people are subscribed to this blog, so maybe that means people read it? I dunno.

Peace out, y’all! And of course, there’s more to come. 🙂

Character Replacement

Wednesday, March 13th, 2013

This is sort of a continuation post from the one about Picture Lock (posted like 5 minutes ago).

So in the midst of my panic over getting all the animation done for my Thesis Film before April 3rd, I wangled together an interesting way of streamlining one of my scenes.

The scene in question is when the entire Mean Girl Gang starts by staring at the Monster Gang, then they all scream, and then they all turn on their heels and run away.

Now, the difficult thing with this shot is that I originally had to animate all 4 of these runs for the length of the entire shot, which meant a lot of work. But an easier way to do it, I realized, would be to use a LOOP of each of them running, instead of animating every step.

But that comes with a slight issue — you see, with an animated character rig in Maya, you can’t just loop a certain PORTION of a character’s motion. If you make an animated motion loop, it loops the entire timeline of that character’s motion in a certain scene. This is all kind of complicated speak I’m giving right now, and there isn’t really a simpler way of explaining it (without using images that is) but what this all basiscally means is that I have to do a bit of Replacement Technique for this shot to work.

And by that I mean — when each character is about to enter their run cycle, I turn off that character mesh’s visibility, and I turn ON the visibility of a pre-prepared looped animation of that same character running. So basically it’s like having two characters doing two separate actions, and at the exact right moment, I switch them, and the viewer isn’t any the wiser. Don’t quite understand what I mean? Watch this video and hopefully it’ll explain:

In that video, the animation of the characters up until they start running is stepped. But the animation of them running is completely smooth. That’s because each character is actually two separate animations, and at the point when they change from stepped to smooth animation is when I switched the different rigs out.

Anyway, this saves me a TON of time, because it means that I hardly have to do any work to get the runs perfect — because I already got them perfect a couple days ago! And also if I wanna change the way one of them runs, it’s no big deal, because each of those 4 characters’ runs is in a separate, editable file that I can update whenever I want. Weeeee!

Now, the funny thing about doing this was that, at the point when the switch-off happens for each character, I had to PERFECTLY match up the two rigs’ poses. Here are some images I got of me doing that for Edgar:

This is the two Edgar Rigs super imposed on one another. As you can see, at first the only thing I matched up was the heel of their left feet.

twoedgars

And here’s the same frame, but with the Edgar Run Cycle turned into a hollow mesh. What I basically had to do, then, was match the other Edgar’s pose to the See-Through Mesh pose in order for the motion to seamlessly flow from one animated segment to the other.

twoedgars2

And here’s the final result. I know it’s kind of hard to see, but the two Edgar Meshes are now in (more or less) the exact same pose and position as each other, and one of them is a see-through mesh, so right now it looks like one Edgar Mesh that’s covered in a Spider’s web, haha.

twoedgars3

Anyway, once I matched up the poses, all I had to do was make the motion smooth and then go over it a couple times to make sure that the whole thing is seamless. And if you look at this video below, you’ll see the (more or less) final product:

(Also the aspect ratio isn’t messed up in this one. Sorry about that (in the first one))


Soo, yeah! Hopefully this was cool/interesting/understandable. I try to make this blog understandable to people who are not Animation-Affiliated, but sometimes stuff gets really complicated, I know. Anyway, that’s all for now. Happy Wednesday!

And of course, there’s ALWAYS more to come. 🙂

Bla Bla I’m Working Whatever

Wednesday, March 6th, 2013

I have less than a month left to animate the rest of my film, (Picture Lock is April 4th for some ungodly reason) so I’ve kind of never been this stressed in my life? Especially since I’m also dealing with Job Apps at the same time. In the mean time, though, here’s some fun I had with Jiggle Deformers earlier today:

Bye!

More To Come~

Animatic v14

Wednesday, February 13th, 2013

That’s right, new animatic! But before I get to it, lemme tell a quick story.


So I had office hours yesterday with Michael Patterson, with the hopes of getting advice on camera direction/cinematography/editing of my piece to have the storytelling flow better. And what I got was that + even more!


For you see, one thing that Patterson noticed right off the bat was that my animatic was kind of unreadable, what with how none of the final locations had been imported into any of the scenes, and how a lot of the establishing shots were still just flat pink photoshop drawings that I made literally a year ago.


So after getting a fire lit under my ass to heavily revamp my animatic, that is exactly what I did — I spent all of yesterday importing the new locations into almost all of the scenes, and I even started up the Party Room scene of my film! And you get to see it AAAAAAAAAAAAAAALLLLLLLLLLL together now, which is great because the resulting animatic was something that is one huge step closer to looking like what my final film will end up looking like come showtime in May.


But before giving the link to the animatic, here are two funny images:


beforenewlocation

This is a still from a scene with the OLD school-yard model (the stand-in version)

afternewlocationlol


….And this is the exact same still, but with the old school model deleted, and the more finalized school model imported.

LOL. So yea, that’s the main logistical difference between the two models of the Schoolyard — the ground isn’t level in the new model. Which ultimately looks better, but it’s just funny because it meant that for a couple of scenes I had to re-position the God-Nodes of the characters so that they were standing correctly on the ground. Uneven terrain! Fun stuff! (not really, but it’s not really a big deal at the same time)

So yea, enough talky talky I guess. Here’s the 14th Animatic of my film. Look at how far it’s come!

And of course, as I always say…

…there is certainly more to come. 🙂

Ugh

Sunday, January 20th, 2013

Wanna know what happens when you rig 6 characters before really knowing how to rig a character correctly?

What happens is you find out about more advanced rigging deformers waaay after the fact, and then you feel like beating yourself up for not using them earlier on because they’re way more convenient/better than using blendshapes for every goddamn facial deformation. Ugh.

curvedeformerstoolateugh


(This is an image of a wire deformer I applied to the hero’s eyelid.)

Luckily, if I need extra deformation options later down the road, I can actually add them after the fact, so it’s not a big deal after all. But still. Damn.

In other news, though, I was testing out Jiggle Deformers today and I realized that I’m totally using them for the characters’ hair because that’s way more easy than animating it by hand. Woohoo! I love computers.

More to come!

The Last Few Days: Schoolyard!

Thursday, January 17th, 2013

The Schoolyard is where a lot of stuff happens in my film, and it’s also the most object-heavy of any of my locations. Also, it’s an exterior, which posed a whole other set of problems, such as making sure that you can’t see the edge of the ground-plane in any horizon shots while also making it not look like there’s absolutely nothing in the world around the Schoolyard area. Anyway, all I can say, really, is thank god for Trees!

So let me start from concept all the way to the so-far finalized status!

My work was cut out for me when my amazing and talented concept artist, Theo Aretos, did concept paintings for the Schoolyard environment:


schoolyard lighting

This painting was done just to get the color scheme down, and at first I found it interesting considering how dry it felt, but then I realized that that’s actually a smart choice, since I want the schoolyard to feel like a sort of unwelcoming place. Also, this entire time I imagined the ground being covered in grass (because at the end of the day, I am a very very uncreative person when it comes to visual design…), so the idea of having it be a DIRT ground was simultaneously new to me, interesting, better than my original idea, AND it’ll make rendering easier (because fuck if I know how I was gonna render an entire field of grass!)

I then asked him to change up the design of the school-building and to also do a few more playstructure designs, as well as a topographical layout of the ground, and I then got these beauties:

playground map

JUSTPLAYGROUND

And so my work began. First off, I started by modelling all the things I knew I needed: a picket fence, a stone wall, the school building, and whatever else I could think of in the way of playstructures to fill the area. Check them all out!

Picket Fence! (this was real easy to do, just a lotta copy and paste)

picketfence

Brick Wall!

(To make the bricks seem authentic, I made a brick-randomizer thingimajigger that basically had clusters attached to 42 different points on a lattice surrounding a base brick shape, and over time those clusters all were programmed to jiggle around in 3D space. As a result, it made… a bit of a difference.)
brickwall

Monkey Bars!

You can’t really see it from this angle, but this structure was meant to look extra terrifying because the bars go up and down very sharply over the length of the structure.
monkeybars

Sandbox!

Complete with sandcastle, shovel, and bucket. 🙂

sandbox

Basketball Thingy!

I legitimately forget what it’s called.

bastketballthing

You like the hoop, though? Yea, that was fun to make. 🙂


hoopfancy

Play Structure Thingy!

This is actually the only play structure that will actually be USED in the story in an at-all important way (it’s what the Mean Girl Gang sits on as they watch the hero enter the monster mansion) and I ended up using the same model as what I’ve been using before since it looked good enough to begin with. I just wonked it up a bit to make it less perfectly straight and symmetrical, I got rid of the swing-set next to it, and later I plan on texturing it so that it looks like it’s actually made of wood and not perfect 3D cubes. (I also plan on texturing everything else in the play yard, but that goes without saying I guess)

playstructure

Terrifying Slide!!

True story: my dad walked into my room at one point over break and saw me modelling this, and he said “You know, slides aren’t supposed to go up …” Anyway, my point in bringing that up is that the physical nature of these objects are not meant to serve their function, but rather serve the overall stylistic purpose of the play-yard, which is to be a sort of intimidating, terrifying place… but not in a super overt way. Really, though, this is the most overtly creepy thing in the entire schoolyard, I think.
slidebaby2

Aaand of course, THE SCHOOL

With a little flag on top~
school

So yea! Once I modelled all these things, I then had to choose one more thing: TREES.

Luckily, Maya comes with a collection of built-in tree types that you can just paint into your scene, so I went through all of them and went with these Birches:

trees4 trees1

Cute, non? Also I looked up Birches and apparently they’re wide-spread all over the Northern Hemisphere in temperate climates, and it’s the national tree of like 3 different countries I think…. so I guess I did a good job of making my film be location-ambiguous!

Anyway, once that was all decided upon, it was time to painstakingly put all this shit together. Why painstakingly? Because this is a lot of memory for my computer to handle. But thank god for Layers in Maya, so I can turn on and off objects to make the program’s running speed faster! Woo.

Playground

And there ya go. Oh, and if you need further explanation of what will happen where in my film, here you go too:

PlaygroundAnnotated

Bam~

Oh and one last thing about the schoolyard — if you’re concerned that some of the play structure objects seem a bit low-res, then let me defend myself with two rationales behind the relatively short amount of time I spent on modelling everything (this entire thing was put together over the course of like 3 or 4 days):

1) A lot of this shit is going to be waaay in the background, with the exception of the play structure that the mean girl gang sits on

2) I don’t have much time left so I gotta cut corners somewhere

So yea. Hope this was interesting to read! And as always, there is certainly more to come. 🙂

Final Winter Break Update: FINAL ANIMATION

Thursday, January 10th, 2013

When I decided I had finished my first character design and it was time to start modelling the characters in Sculptris, I couldn’t get myself to do it at first and I moped around the house for a couple days before finally getting myself to sit down and start doing it. The reason for this was because, to be frank, I was terrified! I was terrified that by continuing onto the next phase of production, I would make some rookie mistake and fuck the whole thing up, and my whole film would fall apart.

The same happened when I had finished my first character model and it was time for me to rig it.

And I probably moped around fearfully for a whole WEEK once I had finished that first character rig, before I finally started animating with it.

Well, I’ve gotten the Rough Layout animation pass done and done well on almost all my 3D assets shots (all but one, to be exact) and I’ve spent the last couple of weeks avoiding the next step out of pure fear. But the time has finally come — I have officially commenced the FINAL ANIMATION PHASE!!!!!!!!!!!!!!!!!!! (as of yesterday).

And let me tell you — I’m still sort of terrified. After all, I’m taking what right now is good-looking rough animation, and then COMPLETELY CHANGING IT. And it’s terrifying! What I’m scared of, really, is that I’ll accidentally fuck it up and then not know what to do. But I’ve only got 80-something days left until Picture Lock, so it’s high-time I do this.

Last night I did a pretty simple shot though, and once I input the new curves, looked at a playblast, and then tweaked them around a bit, this is what I got:

As you can see, it’s not really that good-looking. BUT it’s on its way. The real struggle here, of course, will be to get the curves of the motion of all my characters to be as smooth and on-point as possible.

Now, to all my non-animator readers out there (I know each of my posts get liked by a bunch of random bloggers for some reason, so I know non-animators are reading this) let me explain how this is done:

FinalLayoutHowTo

Hopefully the image reads well. But basically, since all motion of every object and living creature in the WORLD starts with an anticipation, then does the action, and then has an overshoot period (also known as follow-through), I need to basically add frames in the timeline that serve as the beginning- and end-points of those 3 different stages, and then smooth the whole thing out. Thank god for Bezier curves! And really, from just working on 2 shots like this, it seems that the real work-intensive part of this comes not from inputting those points, but rather from getting them in the RIGHT PLACE and getting the TIMING down as well. And lemme tell you — the timing is very rarely going to be perfect on the first try. But luckily, us animators can quickly playblast our animation, watch it, take notes, and fix it. 🙂 Woohoo!

Also, to all those math/science people out there, another name for this Anticipation/Action/Followthrough animation terminology is “Hysteresis,” which describes systems (in this case, motion systems) that depend “not only on its current environment but also on its past environment.” (taken from Wikipedia)

So yea. Art meets science! That’s animation for you.

One scene down, (actually, 1.5 since I’m working on the second one right now) and 13 more to go!

And of course, more to come. 🙂

While I Finish Finals — Credits!

Sunday, December 16th, 2012

So my last Final is on the 19th, which is only 3 days from now, but still — this is a perfect excuse for me to not work on my Thesis for a couple days and to take a goddamned break for once!

However, fun-fact: It’s impossible for me to not think about my film whenever I have free time. And lately I’ve been thinking about one aspect of my film that is ultimately the least important, but it can also make the film a whole lot better:

CREDITS!!

And I know that it makes me a totally typical film student, but I absolutely adore the opening titles for the film “Enter The Void” because I find them to be super inspirational.

These credits are amazing in so many ways. Artistically, they are an impressive feat of editing and graphic design skill. But in relation to Enter The Void as a movie, they do a perfect job of preparing the viewer for a film that no one can ever really be prepared for.

Now, I don’t want to copy Enter The Void’s credits, because other people have done that and it’s not cute.

(Except I love the lyric video for Die Young, so– haha oops whatever)

And besides, having incomprehensible flashing colors and lights for my film wouldn’t really fit with — actually wait no, come to think of it, it kind of would fit (thematically speaking) with Phantoms In The Dark! I mean, Phantoms is a film that deals with topics such as partying and fear and supernatural beings. Scary flashing changing fonts and colors isn’t too far off from that!

But still, I don’t want to copy. However, I am taking inspiration. And I figure a good way of starting with the creative process for this would be to get some cool strong fonts for the title of the film. So I went through all the fonts I have on my computer, and I ended up selecting a mere 45 that had some semblance of something good to them… and then I slowly rounded them down to 12 that all worked pretty well:

12Fonts

My main thought process in rounding down fonts was choosing a look that is, Fun, Scary, and/or  Victorian-Era Vintage, since those are the elements that my film mixes.

And in case you’re curious, here are the names of those fonts:

12Fonts_WithNames

But wait! The fun hasn’t stopped yet. Because by some random twist of fate, I just learned TODAY that apparently Maya can very easily generate 3D text in whatever font and style you want!!! And it can generate it in multiple ways! Behold:

MayaTextTest

(These are just the voice actors obviously. Also I chose fonts that fit the personality types of the characters that each voice actor plays. Hence why mine is all weird-y and ghosty, haha) (Also I’m a weird person to begin with so hey it fits)

As you can see, Maya does a pretty decent job! And yet it also fucks up at a few places too (Notice the missing R in “Dark,” the painful irregularity in Michael Malconian’s credit (then again I knew that font would cause difficulty), and the filled-in holes in the S’s in Jesse Pilchen’s name)

So yea! This is clearly just the beginning. And while I don’t know how the closing titles of my film will eventually turn out, I do know one thing — they’re gonna be awesome. AND I have lots of truly amazing fonts to play around with! When I finish studying for my Lighting and Rendering final today, I may just play around in photoshop making concept-art for the credits, haha!

That’s all for now, though. More to come!

Finally, some 2D Animation!

Monday, December 10th, 2012

That’s right! I’m officially kicking into gear the 2D-animated half of the film, and so far it’s looking pretty good! Then again this first shot was really easy since I did it directly from reference.

Basically, I’m doing the only 2D spoken line of the film, (there used to be two but one of them got eliminated recently, you’ll see soon enough) when the Main Monster Ghost guy floats up to the Hero and says “Hey there, new guy! Why aren’t you partying?? Not having a good time?”

So what I did basically was film reference, cut down that reference into one take I liked, and then exported that take into a .jpg sequence so that I could then feed it as frames into Plastic Animation Paper, the 2D animation software I’m using, and then animate directly on top of it.

Check out the passes here:

(Yes, I do do most of my reference shirtless. But sometimes I put a shirt on because I’m aware that I may want to put it online, but I guess I forgot this time…)

And here are the 2 full takes (the side-view and the front-view) in their latest form (it’s still all rough obviously) because it’s higher-quality in this video:

As you can see, I used Rotoscoping to get body/poses/proportions/everything, but then drew over that to sort of “Cartoonize” it, if you will. After all, the final version of the main monster isn’t going to look like me at all, and if you looked closely, you may have noticed that its proportions are thinner than mine (you can see that I drew the monster’s shoulders much closer together/I made the chest less wide/I made the neck much thinner than my own), so it’s not ~complete~ rotoscoping. Also, that tail had to be figured out completely independently, so that’ll be a challenge, haha.

Anyway, here’s an up-cl0se image of what the Main Monster will look more like:


MainMonsterAccessories11 - Copy

However that design is a little bland, so I played around with accessories I could give him to make him more interesting/give him more character:

12Outfits

(click to enlarge) (also, spot the Lady Gaga one)

Anyway, his design isn’t done yet, but I really like this base that I have. It’s cute like Casper The Ghost, but it’s more grown-up looking, and honestly I’m not trying to be super-original with my designs at this point, I just need to get it out so I can make viewable product as soon as possible. ‘Cause NOW’S THE TIME WHEN IT ALL HAPPENS! Wooo and it’s really happening, heyyy.

More to come, yo.

– Max